Showing posts with label Tips. Show all posts

Sunday, October 9, 2011

Satu Solusi untuk Random Freeze pada Windows 7

PCOptimizzer, 9 Oktober, 2011

Beberapa minggu belakangan ini saya dipusingkan dengan masalah windows 7 yang freeze secara random. Secara tiba-tiba mouse dan keyboard tidak berfungsi. Tidak hanya itusaja, tapi semua dari komputer tidak bisa difungsikan sama sekali. Cara satu-satunya saat menghadapi situasi demikian adalah hard reset. Setelah menjelajah ke banyak forum yang membahas masalah serupa, akhirnya saya sedikit mendapat titik terang tapi mungkin solusi ini akan mengecewakan khususnya bagi para overclockers.
Dari sekian banyak solusi yang di sebutkan diforum-forum, hanya satu solusi yang saya rasa berhasil diterapkan di komputer saya yaitu, menurunkan timing & frekuensi dari RAM.
Apakah performa RAM akan turun???? Yup,.. benar sekali. Performa RAM akan turun, tapi cara ini bekerja (di komputer saya), tapi mungkin juga gagal di komputer lain. Secara default, RAM yang saya gunakan memiliki frekuensi 1333 Mhz. Setting auto pada BIOS tidak membantu memberikan performa terbaik & stabil untuk komputer saya. Untuk itu saya gunakan bantuan software CPU-Z untuk mengetahui timing yang tepat yang mungkin bisa digunakan, karena kesalahan dalam memasukkan nilai pada BIOS dapat saja berakibat kerusakan serius pada RAM. Contoh dari setting RAM yang direkomendasikan untuk RAM yang saya gunakan adalah seperti SS berikut:


Pada daftar timing tersebut, saya mencoba beberapa konfigurasi dan tentunya dengan sedikit modifikasi. Akhirnya saya mendapatkan timing yang tepat untuk kesetabilan kerja pada frekuensi 1066 Mhz dengan timing 7 7 7 21 dengan tRC 27 dan tegangan pada 1,6 volt. Sedikit perubahan pada tegangan atau timing dapat menyebabkan terjadi freeze.
Untuk sementara, saya mengambil kesimpulan sendiri bahwa yang menyebabkan freeze adalah masalah kestabilan timing/ frekuensi/ dan tegangan. Untuk peringatan, cara ini berhasil pada komputer saya tapi belum tentu berhasil di komputer lain. Mungkin untuk sekedar memastikan, dapat digunakan MEMTEST terlebih dahulu sebelum akhirnya mengutak-atik setting RAM pada BIOS.

Saturday, April 2, 2011

Lolos dari Filter Server menggunakan Proxy Server


Akhirnya... setelah sekian lama membolos dari update blog, saya memutuskan untuk menulis sesuatu meskipun sebenarnya ga ngerti juga apa yang mau di tulis. Tapi ya sudahlah, mungkin tips berikut bisa sedikit membantu apalagi untuk orang yang rada gaptek seperti gue atau para newbie di bidang IT & teknologi (seperti gue juga).

Kali ini saya akan sedikit memberikan tips bagaimana caranya buka FesBuk. Maksudnya disini bukan mendaftar baru di FB. Tapi mungkin ada yang pernah punya masalah buka FB di kantor karena diblokir pada jam-jam tertentu. Tips berikut mungkin sedikit membantu. Untuk yang sudah ahli, mohon saya jangan ditimpukin bata karena saya masih newbie & rada gaptek.

Untuk bisa lolos dari blokir server kantor, cara satu-satunya yang saya tau adalah pake Proxy. Penjelasan mengenai apa itu proxy silahkan klik aja di sini Proxy Server.

Cara yang pertama adalah, memasukkan alamat proxy server ke browser yang kita pakai atau langsung ke pengaturan koneksi internet dikomputer. Untuk alamat proxy server bisa cari lewat om google. Saya bantuin cari dhh, silahkan klik disini & pilih sendiri yang disuka Cool-Proxy.net

Setelah dapat alamt proxy, selanjutnya tinggal memasukkan ke pengaturan koneksi internet. Contohnya pada FireFox, klik tombol Option > klik tombol Advanced > selanjutnya pilih tab Network & klik tombol Setting. Disitu ada pilihan untuk mengisi alamta proxy. Silahkan dipraktekkan & semoga membantu.

Friday, July 30, 2010

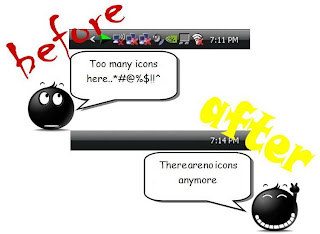
Hide Icons in Sytem Tray


Sometimes, icons in sytray is so annoying. so that, I deleting the icons.. well.. not delete, just hide,.. and seek :p. PCOPtimizzer - July 30, 2010

Here are the steps to set the icons in sytem tray to be hidden. Actually, this is not so important. But sometime the icon looks like so faze. It doesn't affect to the system performance.
First, open registry editor from start menu by clicking windows button > run > and than type 'regedit' in run windows.
affter that, find this string in registry editor by expolring:

HKEY_CURRENT_USER\Software\Microsoft\Windows\CurrentVersion\Policies\Explorer

In 'Explorer' key, create a new DWord value and name it as NoTrayItemsDisplay. As you can see in the image bellow.
(click on the image to enlarge)
for value data in, set as 1. To deactivate the string, just set the valua data as 0.
Close registry editor and restart or log off the system to take the effect.

Thursday, June 24, 2010

Task Manager Has Been Disabled, How to Fix It?

Task Manager Has Been Disabled By Your Administrator Step by Step Methods for Fixing Task Manager

Many times when working on a computer that has been infected with a virus, trojan, or piece of spyware I find myself with the Task Manager being disabled. Malware creators like to disable Task Manager so it makes solving the problem and removing the issue difficult.

If this happens you'll normally have to edit the Windows registry to fix the problem. A restriction has been placed on the user to not allow them to run Task Manager, this might be ok in an office environment where the IT department wants to control things, but in a home office this can cause major problems trying to fix a malware or virus issue.

Listed below you will find the many ways to reenable Task Manager along with an automatic method that works wonders.

To open the Task Manager, you normally would do one of the following:

  • Press CTRL-ALT-DEL on the keyboard
  • Press CTRL-SHIFT-ESC on the keyboard
  • Right-click on a blank area on the start bar and choose Task Manager
  • Click on Start, Run and type TASKMGR in the run box and press Enter
  • Sometimes instead of Task Manager opening you'll see the following screen. In these cases, you'll have to follow the methods below to re-enable access to the Task Manager.

First we'll begin with the various registry modification methods for correcting this problem.

Method 1 - Using the Group Policy Editor in Windows XP Professional
  • Click Start, Run, type gpedit.msc and click OK.
  • Under User Configuration, Click on the plus (+) next to Administrative Templates
  • Click on the plus (+) next tSystem, then click on Ctrl+Alt+Delete Options
  • Find Remove Task Manager in the right-hand pane and double click on it
  • Choose the option "Not Configured" and click Ok.
  • Close the Group Policy Window

Method 2: Change the Task Manager Option through the Run line
Click on Start, Run and type the following command exactly and press Enter

REG add HKCU\Software\Microsoft\Windows\CurrentVersion\Policies\System /v DisableTaskMgr /t REG_DWORD /d 0 /f

Method 3: Change Task Manager through a Registry REG file
  • Click on Start, Run, and type Notepad and press Enter
  • Copy and paste the information between the dotted lines into Notepad and save it to your desktop as taskmanager.reg
------------------------------------
Windows Registry Editor Version 5.00

[HKEY_CURRENT_USER\Software\Microsoft\Windows\CurrentVersion\Policies\System]
"DisableTaskMgr"=dword:00000000
-------------------------------------
  • Double click on the taskmanager.reg file to enter the information into the Windows registry

Method 4: Delete the restriction in the registry manually
  • Click on Start, Run, and type REGEDIT and press Enter
  • Navigate to the following branch
HKEY_CURRENT_USER \ Software \ Microsoft \ Windows \ CurrentVersion \ Policies\ System
  • In the right pane, find and delete the value named DisableTaskMgr
  • Close the registry editor
Method 5: Download and Run FixTaskManager program
  1. Click on the following links and download the program FixTaskManager to your Desktop Main Site Backup Location
  2. Double-click on the file FixTaskManager on your desktop and run it
Source: www.pchell.com

Sunday, February 28, 2010

Clear Paging File

PCOptimizzer - February 28, 2010
For privacy reason and maybe security reason, 'paging file' is need to be cleared because people can exploring somebody's activity in computer from page file.
This is the steps to set page file automatically cleared from the computer after system shutdown.

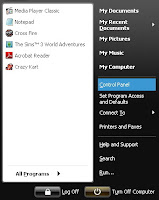
  • Open control panel menu from 'start windows> Control Panel'.
  • click on the image to enlarge
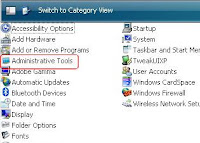
  • In classic view, click on 'administrative tools', such as the image below.
  • click on the image to enlarge

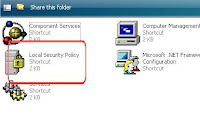
  • Click on 'local security policy', the new window will be shown as the image below.
  • click on the image to enlarge
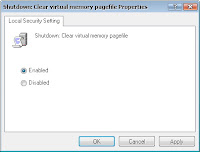
  • In this window, click on 'local policies> security option'. In the right pane, search 'shutdown: clear virtual memmory page file' and double click.
  • click on the image to enlarge
  • Set to be Enabled and click OK.
  • click on the image to enlarge
After that, the page file will be deleted after system shutdown


Wednesday, October 28, 2009

$ 600 Gaming Computer

Maybe this computer is not suitable for enthusiastic gamers. But this computer is more than enough to play the latest nextgen game without any lag. PCOptimizzer - Oct 28, 2009.

I made the new one of cheap gaming computer spesification based on Intel processor. Here are the details based on bhinneka.com on Oct 28, 2009.


ProductSpesificationPicturePrice
ProcessorINTEL Core 2 Duo E7300
2.66 GHz, FSB 1066 MHz, 3MB Cache, Dual-Core, Socket LGA775
$ 113
MotherboardASROCK 945G-DVI
Socket LGA775, Intel 945G, FSB 1066, PCI-e x16, VGA, SATAII 300, GbE NIC, USB 2.0, Audio, DDR2 667, Dual Channel, Intel Core 2 Duo & Conroe Support

$ 50
Hard Disk
SEAGATE Baracuda
500GB, 7200 RPM, SATA II 300, 16MB Cache
$ 57
MemoryOCZ OCZ26671024V
1GB DDR2 PC2-5400, 667MHz, Value Series
$ 17
Optical DriveLG GH22
Internal DVD Recordable, Black (Changeable Bezel), Dual Layer, LightScribe, SecurDisc Feature, DVD+R Write 22x, DVD-R Write 22x, DVD-R DL 12x, DVD-RAM 12x, DVD-RW 6x, CD-R 48x, CD-RW 32x
$ 29
PC CaseCOOLER MASTER Elite 310
Middle Tower, 4 x 5.25", 6 x 3.5", Front USB 2.0, Audio, FireWire
$ 49
Power SupplyTHERMALTAKE LitePower 400WATX
400 watt 2.0 12V, Fan 12cm, RSI, PCI-E 1, SATA 1, W0162RE

$ 44
Graphic CardBIOSTAR GeForce GTS 250
NVidia GeForce GTS 250, 512MB DDR3, 256-bit, DVI, HDCP, HDMI, HDTV, PCI-e x16 2.0
$ 130
MonitorPHILIPS 160E1SB
15.6", 1366 x 768, 0.252 mm, 8ms, 500:1, 250 cd/m², D-Sub, Widescreen
$ 112
*not including keyboard, mouse and speakers.
Estimate total price : $ 601


Monday, August 24, 2009

Hides Computers on the Network

PCOptimizzer - august 24, 2009.

Computer was connected to the network can be displayed on another computers by using "view workgroup computers". Through this path, the shared documents can be accessed by another computers. For security reasons, the computer can be hidden from workgroup computers so can't be accessed from another computers. Here are the steps to set the computer to be hidden from the network:

  1. open command prompt by using run tools, type cmd in run window.
  2. type command NET CONFIG SERVER /HIDDEN:YES and press Enter
  3. after appears a message like the following picture, then the computer will not be displayed on another computer.

Saturday, August 15, 2009

Copy and Paste Files to CD

In order to burn CD you do not only have to use third party software such as Nero, PowerDVD Copy, etc., but also you can use Windows CD Writing Wizzard for your purpose in burning data to the blank CD. pcoptimizzer - august 15, 2009.

If you don't have the software to write data cd, windows have provided a tool by default. Here are the steps to burn data by using Windows CD Writing Wizard:

  1. Insert the blank CD into drive optic.
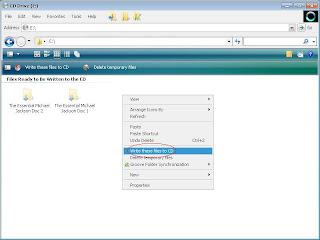
  2. Copy files or folder to blank CD, or you can also drag the files to CD directory (see the picture below).
  3. Select "write these files to CD" option, as you can see in the image below
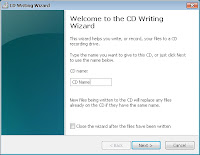
  4. After the wizard shown, type the CD name and click next to start burning process.
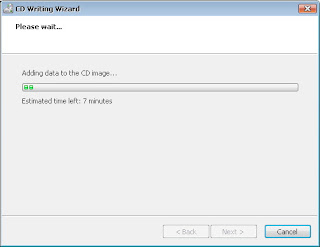
  5. The burning process will be displayed as the image below

Sunday, July 26, 2009

Show Hidden Files by Using Command Prompt

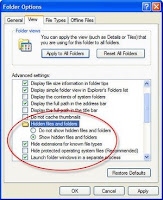
Perhaps most of people ever have problems with hidden files because of computer viruses. The files can't be seen even has tried to show with "Hidden Files & Folder" option in "Folder Option" .It's all because of the files was made super hidden by viruses. To manage the files unhide, we can use Disk Heal software. If you don't have the software or maybe you don't have a access to internet connection to download the software, you can use "Command Prompt".

First, you must open command prompt by using run tools. Press start button> Run. And than type"cmd". Press enter or ok

In command prompt, set the files directory. Example: file Document in flashdisk with directory I, you must type " I " and " : ", enter. As you can see in the image below

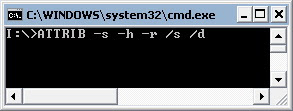
After that, you must type " ATTRIB –s –h –r /s /d ", and press enter. You can see in the image below.


Now you can close command prompt tools by clik x button. All Files in the directory has been set to unhide.

Tuesday, June 23, 2009

Set the Directory to Install the Software

This article was published in indonesian
When installing a software, windows will set the directory C: \ Program Files as default directory of the software. This directory usually can be changed when doing the installation process by choosing a new directory in the Browse directory option. Making it a bit if every time we want to install the software we need to determine the directory of the software.

Actualy, we can set the place of default directory. This is the steps to change directory who set by windows as default into wich we set
  • Open the registry editor click run on the start button or press the button on the keyboard windows and R simultaneously. type regedit and press ENTER.
  • Go to HKEY_LOKAL_MACHINE \ Software \ Microsoft \ Windows \ CurrentVersion.
  • Search value ProgramFilesDir and change its content according to the directory that we want. example is D: \ Software Gue.
  • Close the registry editor and restart the computer. The new instaled software would be set into directory that you have set yourself.

Sunday, June 21, 2009

Increase Internet Connection Speed of Dialup, DSL and Broadband

This article was published in indonesian
Specific to the type of internet connection dialup, DSL and Broadband, the internet bandwith can be force by a little with a ping method so that the Internet connection speed can be increased.
Here are the steps to perform the ping method

  • open "command promt.exe", type "ipconfig / all"


  • You can see "Windows IP Configuration"


  • Open tool "Run" and type "ping (space) address of DNS Servers (space)-t, press" ENTER "


next, let the computer continue to ping while browsing the Internet

Saturday, June 20, 2009

Re-Publish: Increasing Performance of NVidia Graphics on Notebook

This article was published in indonesian
Notebook has a lower performance than the desktop even with the same specifications between the two. Performance difference is also not excluded in the Graphic Processing Unit (GPU). For example, GeForce 8600m GT on a laptop with equivalent capabilities GeForce 8500 GT. In addition, the stability of the graphics work on the laptop is also less than satisfactory. Often occur in a significant decrease in fps while playing the game. Of course this is influenced by the quality of graphics in the game and the detail object. To reduce the problem a little, at least slightly improve the performance of the GPU, it can be fixed with a driver update the GPU to a newer version.

For example this is used with a laptop GPU NVidia GeForce 8400M G. Of the results to update a driver GPU, seen that the performance of GeForce 8400M G increased by 10.72% without overclocking. The results obtained from the driver with the default GPU driver version 182.50 (GeForce 8 desktop version)

forceware v.179.48 (notebook version)


forceware v.182.50 (desktop version)


Here's how to install the driver desktop's version to the laptop:
  1. Open System Properties> Hardware> Device Manager> Display Adapter> NVIDIA GeForce> Driver> Update Driver.
  2. In the Hardware Update Wizard, remove the check on the option Show compatible hardware. Select the type of GPU and click Have Disk.

Jangan Asal Tuduh Ulah Virus!

PCPlus - Jumat, 19 juni 2009
Bayangkan jika ada virus seperti Influenza A (H1N1, dulu disebut Flu Babi) yang berjangkit di komputer. Maka gara-gara beberapa komputer di sebuah negara, sebut saja Indonesia, mengandung virus, blokir atas semua komputer di Indonesia virus akan dilakukan semua negara lain. Runyam bukan?

Untungnya dunia TI dan dunia nyata tidak sama. Di dunia TI ada kemampuan mendeteksi dan mengidentifikasi komputer sehingga kita dapat membedakan mana komputer yang baik dan mana yang jahat.

Contohnya kasus Conficker. Pada awal kemunculannya, virus (worm) mengganas karena masih belum diketahui dengan persis apa saja aksinya dan bagaimana mengidentifikasi komputer yang menjadi korban Conficker. Baru pada akhir Maret bermunculan tools-tools scanning jaringan yang dapat dengan baik membedakan mana saja komputer yang terinfeksi Conficker. Kini beberapa tools bahkan mampu mendeteksi komputer di jaringan yang belum di-patch MS 08-067, yang dieksploitasi Conficker (untuk iInformasi lebih lanjut, bacalah Conficker Scanner Review di http://www.vaksin.com/2009/0409/Conficker%20Scanner/conficker%20scanner%20review.htm).

Belum Tentu Karena Virus
Menurut Vaksincom, sesungguhnya lebih dari 60% masalah komputer yang dikeluhkan sebagai virus bukanlah ulah virus. Biang keroknya justru masalah lain, mulai dari hardware, driver, jaringan, ketidaktahuan user atau kesalahan setting/klik.

Ketika komputer kita tidak lagi bisa memainkan musik misalnya, sering kita juga langsung saja mendakwa virus sebagai penyebab. Padahal mungkin penyebabnya adalah terhapusnya file driver multimedia.

Bagaimana jika komputer sering restart? Karena terinfeksi viruskah? Belum tentu. Periksa apakah ini bukan gara-gara power supply-nya yang lemah. Jika matinya mendadak bak asupan listriknya dicabut, bisa dipastikan bukan virus yang bersalah. Restart yang diakibatkan oleh virus haruslah melalui sofware dan proses restart.

Mencabut USB flash disk secara mendadak dari port USB pun dapat menyebabkan terkorupsinya file, atau data hilang, yang kerap dituduh sebagai ulah virus. Jadi ketika file terkorupsi, amati dulu beberapa parameter lain, seperti adanya file autorun.inf di USB flash disk dan blokir terhadap “Task Manager”, “Registry Editor” dan “MS Config” di sistem Anda. Kalau tidak dikuatkan oleh beberapa parameter lain, penyebab masalah adalah rusak/bermasalahnya hardware (USB flash disk), bukan karena infeksi virus.

Bagaimana jika program antivirus Anda “menyalak” dan memberikan konfirmasi bahwa ada file virus yang ingin mengakses sistem? Juga belum tentu sistem Anda sudah terinfeksi virus. Bisa saja Anda baru mengkoneksikan USB flash disk bervirus yang mencoba menginfeksi komputer tetapi keburu dihentikan oleh program antivirus Anda.

Lalu kalau jaringan komputer terasa merayap bak kura-kura? Atau komputer mengeluarkan puisi cinta, dan data hilang? Pasti virus tuh, begitu tuding kebanyakan orang. ‘Masih untung’ jika virus hanya iseng menyembunyikan data Anda. Mungkinkah terjangkit Kespo, virus dengan payload jahat yang menghancurkan dan mengenkripsi data?

Dalam banyak kasus, virus memang menyebabkan jaringan komputer kita menjadi lambat. Namun melambannya jaringan tidak selalu disebabkan oleh virus. Karena itu, penting bagi kita sebagai orang awam untuk setidaknya dapat melakukan analisis awal agar tidak salah diagnosa dan mengakibatkan ketidakefisienan.

Cara Mudah Kenali Virus
Di sini kita akan belajar menganalisis sebuah keadaan di dalam komputer, agar tidak secara membabi-buta menyalahkan virus. Tak sulit kok memastikan apakah sebuah komputer terinfeksi virus atau tidak.

1. Pakai virus Removal Tools, seperti Kaspersky Virus Removal Tools (http://devbuilds.kaspersky-labs.com/devbuilds/AVPTool), Stinger dari Mc Afee, Dr Web Cure it! (ftp://ftp.drweb.com/pub/drweb/cureit/launch.exe), atau Norman Malware Cleaner (http://normanasa.vo.llnwd.net/o29/public/Norman_Malware_Cleaner.exe). Dengan mengaktifkan tools gratis tersebut, Anda bisa mengetahui apakah komputer mengandung virus atau tidak.

2. Perhatikan pesan-pesan khas virus yang muncul melalui browser.
Jika wallpaper desktop komputer Anda berubah menjadi MaxTrox (Maximum Troxer) dengan tambahan waktu di tengah atas dan komentar di tengah bawah serta identitas di kiri bawah, jelaslah sudah kalau komputer Anda terjangkit virus Maxtrox. Wallpaper tersebut akan aktif setiap tanggal 1 s/d 6 pada bulan April, Agustus dan Desember. Sedangkan waktu yang dibuat oleh virus berubah-ubah sesuai dengan waktu pada komputer user. Komentar yang dibuat pun disesuaikan dengan nama user yang aktif saat itu.

3. Tidak bisa mengakses Task Manager, MS Config, CMD, Regedit.
Seringkali virus akan memblokir aplikasi Task Manager, Regedit, CMD, Msconfig. Mengapa? Karena virus berusaha mempertahankan diri dan semaksimal mungkin membatasi akses komputer korban terhadap aplikasi utility seperti Task Manager, MS Config, Regedit dan Command Prompt yang dapat digunakan untuk mendeteksi dan membasmi virus di komputer.

Dengan menggunakan Task Manager, kita dapat mematikan proses virus yang sedang aktif di memori. Dengan MS Config, kita dapat menghapus semua prosedur yang akan dijalankan ketika komputer tersebut Logon. Karena itulah virus akan memblokir semua cara yang dipakai oleh user untuk mematikan proses virus.

4. Muncul ikon dengan ekstensi palsu.
Ikon yang paling favorit dipalsukan oleh virus adalah ikon “MS Word” dan “Folder”. Sebenarnya ini merupakan rekayasa sosial yang mudah, di mana virus mengubah ikon file virus yang berekstensi .exe dengana ikon untuk file dokumen MS Word atau Folder. Akibatnya, pengguna komputer terkecoh dan menjalankan file virus yang dikiranya file MS Word atau folder. Ikon lain yang sering dipalsukan adalah ikon gambar JPEG, dan ikon Excel.

Pada beberapa kasus virus canggih, ekstensi file bahkan akan disembunyikan oleh virus sehingga dengan mata telanjang tanpa analisis lebih jauh Anda tidak bisa membedakan file virus dengan file dokumen MS Word asli. Untuk ini, virus mengubah setting pada “Folder Options”. Coba Anda klik [Tools] pada Windows Explorer, pilih [Folder Options] [View] dan nonaktifkan (uncheck) Hide extensions for known file types dan Hide protected operating system file.

Tools Alternatif
Ada satu pertanyaan menarik. Bagaimana kita membasmi virus kalau program utility Windows seperti Task Manager, MS Config dan Regedit sudah diblokir virus?

Jawabannya adalah menggunakan tools utility pihak ketiga seperti Process Explorer. Namun jika tools pihak ketiga ini juga diblokir oleh virus, kita terpaksa main kucing-kucingan. Maksudnya, gunakan tools utility pihak ketiga lain yang banyak tersedia di Internet (www.download.com). Atau ganti saja nama tools Anda yang diblokir. Jadi bukan hanya pembuat virus yang bisa mengelabui korbannya, kita juga bisa mengelabui virus.

Beberapa tools alternatif yang sering digunakan untuk membantu/menggantikan utility Windows adalah:
1. Kalau Task Manager tidak bisa digunakan, kita dapat menggunakan Process XP (http://technet.microsoft.com/en-us/sysinternals/default.aspx), Security Task Manager (http://www.neuber.com/taskmanager/download.html), dan lain-lain. Dengan tools pembantu ini kita dapat melihat proses yang menggunakan memori terbesar yang bisa diindikasikan sebagai virus yang sedang aktif

2. Jika kita tidak bisa menggunakan MS Config, coba gunakan
a. HijackThis (http://www.bleepingcomputer.com/files/hijackthis.php),
b. a2hijackfree (http://www.hijackfree.com/en/processdetails/file167.aspx),
c. Comboscan (http://www.geekstogo.com/forum/Deckard-s-System-Scanner-formerly-Comboscan-file19.html).
Sebagai catatan, ketiga tools tersebut cukup baik dan saling melengkapi.
***
Nah, dengan cara melihat langsung gejalanya atau dengan menggunakan bantuan tools, kita sekarang dapat memastikan apakah komputer terinfeksi virus atau tidak. Kenali dahulu gejalanya, baru kita bisa mengatakan bahwa komputer terindikasi terinfeksi virus. Jangan langsung panik!

OK, selamat mencoba dan menganalisis!
Marcel “Gemini Man” Glenn Latupeirissa
info@vaksin.com


Sumber: PCplus

Thursday, June 18, 2009

Berkirim File Terenkripsi ke PC Lain

PCPlus - Jumat, 12 juni 2009
Setelah file dienkripsi dengan cara yang sudah kami tunjukkan (lihat “Mengamankan File dan Folder” & "Amankan Data Penting dengan cara Enkripsi") otomatis file telah terkunci dan tidak bisa dibuka oleh pengguna manapun. Jika kebetulan Anda ingin mengirimkan salah satu file yang terenkripsi, otomatis Anda harus mengekspor sertifikat enkripsi pribadi Anda dari PC asal dan kemudian mengimpornya ke PC lain.

Berikut adalah cara mengekspor sertifikat Anda:
1. Klik [Start]> [Control Panel]> [Network and Internet]> [Internet Options] untuk membuka Internet Options.
2. Di jendela Internet Options, klik tab [Content].
3. Pada bagian Certificates, klik tombol [Certificates] setelah itu pilih kunci enkripsi Anda dan pilih tombol [Export…].
4. Di wisaya yang muncul, klik Next, lalu pilih [Yes export the private key] dan klik [Next] sekali lagi.
5. Berikan tanda cek di semua opsi yang tersedia, kemudian klik [Next].
6. Masukkan password untuk sertifikat tersebut dan klik [Next] lagi.
7. Kali ini, tentukan lokasi dan nama file dari sertifikat tersebut di kolom File name. Tentunya Anda harus mengklik [Next] lagi untuk melanjutkan.
8. Klik [Finish] untuk memulai proses ekspor sertifikat.

Setelah sertifikat jadi, pindahkan ke komputer lain. Di komputer lain, lakukan langkah berikut:
9. Ulangi langkah 1 sampai 3. Hanya saja kali ini klik tombol Import. The Certificate Import Wizard akan muncul. Klik [Next] untuk melanjutkan.
10. Tunjukkan lokasi file sertifikat yang tadi Anda ekspor kemudian klik [Next].
11. Masukan password yang Anda berikan pada saat Anda mengekspornya dan kemudian klik [Next].
12. Klik [Place All Certificates in The Following Store] kemudian klik [Browse] untuk membuka kotak dialog The Select Certificate Store. Pilih [Personal] dan klik [OK].
13. Klik [Next] dan kemudian klik [Finish].

Sumber: PCPlus

Saturday, June 13, 2009

Membuat Bootable UFD menggunakan UNetBootin

UNetBootin merupakan software yang bisa digunakan untuk membantu anda membuat UFD Bootable. Tersedia beberapa pilihan distro linux yang bisa digunakan. Dengan demikian, pada komputer yang tanpa sistem operasi sekalipun tetap bisa digunakan hanya dengan menggunakan sistem operasi yang sudah terinstal pada UFD. UNetBootin dapat di unduh dari unetbootin.sourceforge.net.

Untuk menginstal, cukup colokkan UFD, tentukan distro Linux yang diinginkan, dan masukkan dstination image dari distro Linux yang ingin di instal ke UFD. Kemudian tekan OK. Setelah Linux berhasil diinstal ke dalam UFD, restart komputer dan lakukan booting melalui UFD.

Friday, June 12, 2009

Mengubah Jenis Font yang digunakan pada Command Prompt

Secara default, jenis font pada command promt hanya ada dua yaitu Raster Fonts dan Lucida Console. Font masih bisa di tambahkan lagi dengan jenis Consolas dan Courier New. Untuk menambahkan jenis font yang baru caranya adalah sebagai berikut:
  • Buka Registry Editor dengan cara klik tombol Start> Run> ketik regedit pada jendela Run.
  • Browse registry editor ke  HKEY_LOKAL_MACHINE\Microsoft\Windows NT\CurrentVersion\Console\TrueTypeFont.
  • Buatkan New String Value dan beri nama 00 (nol nol).
  • Pada string value ini, isikan nama font Consolas, kemudian klik OK.
  • Tutup jendela registry editor kemudian restart komputer.
  • Selanjutnya buka Command Prompt dengan cara klik tombol Start> Run> ketik cmd pada jendela Run.
  • Setelah jendela Command Prompt terbuka, klik kanan pada bingkai bagian atas dan pilih properties. Selanjutnya pilih tab Font. Terlihat pada jenis pilihan font ada nama font Consolas yang baru ditambahkan.
  • Untuk mengaplikasikan jenis font ini, klik pada font Consolas kemudian klik OK.
Sekarang command prompt yang digunakan menggunakan jenis font Consolas.

Thursday, June 11, 2009

Membatasi Kapasitas Harddisk untuk Penggunaan oleh System Restore

System Restore berfungsi cukup penting, karena dari System Restore komputer yang error bisa dikembalikan pada kondisi sebelum terjadi error. Jadi sebaiknya System restore harus tetap dalam kondisi enable. Tapi yang menjadi masalah, system restore menyita cukup banyak ruang di harddisk. Untuk komputer dengan kapasitas harddisk raksasa tentunya bukan menjadi masalah, tapi lain halnya pada komputer dengan kapasitas harddisk pas-pasan. Solusinya adalah membatasi kapasitas system restore pada harddisk. Berikut ini adalah langkah-langkahnya:
  • Buka System Restore dari Menu start> All Programs>  Acessories> System Tools> System restore.
  • Setelah system restore terbuka, klik System Restore Settings.
  • Selanjutnya akan terlihat partisi harddisk yang dimonitoring secara otomatis oleh system operasi.
  • Pilih salah satu partisi harddisk, geser persentase harddisk yang akan terpakai oleh system restore sesuai dengan yang dibutuhkan, klik OK.
Sekarang kapasitas yang digunakan oleh system restore untuk membuat backup sudah dikurangi.

Wednesday, June 10, 2009

Memblokir Fungsi Task Manager

Melalui task manager kita dapat memantau, mengaktifkan bahkan mematikan suatu proses yang sedang berlangsung di komputer. Salah dalam mematikan proses bisa berakibat komputer menjadi error, hang atau yang lainnya. Karena pentingnya fungsi task manager, ada baiknya penggunaan task manager dibatasi guna mnghindari kesalahan akibat dari orang usil yang tidak bertanggung jawab.
Langkah-langkah untuk mematikan task manager adalah sebagai berikut:
  1. Buka registry editor dengan cara klik tombol star> run. Kemudian ketikkan regedit, kemudian tekan enter.
  2. Pada registry editor, browse ke HKEY_CURRENT_USER/Software/Microsoft/Windows/CurrentVersion/Policies/System.
  3. Buat DWORD Value yang baru dengan cara mengklik kanan pada jendela sebelah kanan, pilih new> DWORD Value.
  4. Beri nama DWORD Value yang baru dibuat tersebut dengan nama DisabletaskMgr kemudian buka dan masukkan nilai 1 pada Value data, kemudian tekan OK.
  5. Tutup jendela registry editor, restart komputer. 
Sekarang fungsi task manager tidak bisa digunakan karena sudah diblokir. Untuk mengaktifkannya kembalai, pada registry editor buka lagi DisabletaskMgr, pada Value data isikan nilai 0.